
Monday, April 30, 2012
Project 52: SEVENTEEN
A lot of you know my sweet little cousin, Lizzie. Well, she's still sweet but she's not so little anymore. She's already thirteen! She's charming and silly and the most tenderhearted girl. I love how she plays with her very own style and is always wanting to express herself. She tries hard at everything she does and sees the world with open arms. I miss that feeling myself. It's funny how you can look up to someone who is younger than yourself (and oddly at an age that was really sheer torture for me). Thirteen was all about doubting myself and wanting to be invisible. Lizzie seems to just bask in the sunshine of her youth. One of those kids who knows that she's young and takes advantage. Thinks about all the things she can be. Determined to be good at what she does. Knows what she likes and doesn't like. I love that about her. Shit, it'll drive ya nuts at times but isn't that what we want for our girls- a sense of self. She's young yet. Not quite sure who she will be in the end but something about her just screams life long learner. I think she might not ever be "finished". I love that. This is Lizzard on Easter- yup on an Egg hunt. Girl is no fool... she knows to not ever give up on chocolate!

Monday, April 23, 2012
Burp Cloth How To
So a sweet friend of mine recently asked how I make burp clothes. Ladies, it's so simple you will wonder why you ever let your baby barf on just any old rag. If you can sew a straight line you got this. Here's your basic instruction.
1. Buy a package of good ol' fashion cloth diapers. You can find them at Target. Comes out to about a $1/ diaper. Now I know you may be confused because, shit you thought I said we were making burp cloths, not diapers. Well for us youngins you may not realize that these are the ancient cloth diapers of yesteryear that we now repurpose as kick ass burp cloths.
2. Now select what cute little fabric you want to use. You just need a decent scrap piece so if you have to head to the fabric store a quarter of yard will make you several burp cloths. Now lay out your cloth diaper and spread your fabric scrap over one end of it. Cut your fabric in the general shape that you want it to be making sure that it's a bit wider than the cloth diaper so that you can make a nice seam.

3. Now line up one long side of the fabric with the short edge of the cloth diaper. Place right sides (pretty sides) together. *in other words, put the pretty side of the fabric down- you are going to flip this bad boy over in a minute* Now put a couple pins in and sew this one straight line. Voila! You just made a nice little hem for the back of the burp cloth. Now pull the fabric back and iron at the seam to get a nice crisp fold.

4. Ok now flip over the cloth diaper. At this point, you are ready to make the edges all pretty by folding and ironing your fabric. So bring up the fabric so it lays tight against the cloth diaper. Now fold the left side and right side in so that your fabric edge lines up with your cloth diaper. Now fold down the unfinished edge of the fabric so that it looks straight across. You will need to iron each seam to get a crisp look. Now pin it. I like a ribbon across the top because you need a little preciousness when your baby regurgitates nasty formula all over you. You can pin your ribbon on top of or under your fabric- sewers preference. **Make sure you are using ribbon for sewing found in the fabric department and not floral ribbon that will deteriorate when you wash it**


1. Buy a package of good ol' fashion cloth diapers. You can find them at Target. Comes out to about a $1/ diaper. Now I know you may be confused because, shit you thought I said we were making burp cloths, not diapers. Well for us youngins you may not realize that these are the ancient cloth diapers of yesteryear that we now repurpose as kick ass burp cloths.
2. Now select what cute little fabric you want to use. You just need a decent scrap piece so if you have to head to the fabric store a quarter of yard will make you several burp cloths. Now lay out your cloth diaper and spread your fabric scrap over one end of it. Cut your fabric in the general shape that you want it to be making sure that it's a bit wider than the cloth diaper so that you can make a nice seam.


4. Ok now flip over the cloth diaper. At this point, you are ready to make the edges all pretty by folding and ironing your fabric. So bring up the fabric so it lays tight against the cloth diaper. Now fold the left side and right side in so that your fabric edge lines up with your cloth diaper. Now fold down the unfinished edge of the fabric so that it looks straight across. You will need to iron each seam to get a crisp look. Now pin it. I like a ribbon across the top because you need a little preciousness when your baby regurgitates nasty formula all over you. You can pin your ribbon on top of or under your fabric- sewers preference. **Make sure you are using ribbon for sewing found in the fabric department and not floral ribbon that will deteriorate when you wash it**

5. Ok now you are ready to sew some more straight lines. I like to go up one side and across and down the other. Then I put one last row of stitching across the top of the ribbon to secure it. Bam, done. I always like to add a monogram for the baby cause that is just the finishing touch. So just run that up to your local shop or find a friend who has an embroidery machine (then call me and tell me their contact info so I can mooch off their machine ;)

* Sang forget you ever saw this little burp cloth
Sunday, April 22, 2012
Project 52: SIXTEEN
How the hell did women survive before washing machines? I spent 10 days without a working set and I thought I was going to lose my damn mind! So shit, I'm real freakin grateful for my new washer that is HUGE. This little lady can wash twice what my old one could in a single load. She's a real beaut- we're talking tempered glass, stainless steel accents and one of them real fancy digital displays. My sweet gal even sings a song when she's done. You just can't beat that.

- Posted using BlogPress from my iPad
- Posted using BlogPress from my iPad
Sunday, April 15, 2012
Master Bedroom... Monkey see monkey do
Well I've been dying to post this little master bedroom renovation and thought I would wait until I'm completely done, but hey, that's just no fun! Our master bedroom is a bit bland. It's calm and spacious, but there's nothing exciting about it. When Ryan and I were first married, we went out and did the whole "buy a room, no down payment, zero interest" thing. I really do like the bedroom set we picked but my taste has changed over the years. Now I like a bit more eclectic and less matchy matchy. We have also been down a headboard since we upgraded to a king size bed a couple years ago. In my 2 year search for cheap headboards I've become paralyzed with ideas. There are so many good ones out there that I just didn't know what to choose. I wanted a headboard that would soften the feel of all the heavy furniture but would still hold it's own in such a large room. I also just couldn't bring myself to ditch all my "buy a room" furniture because my tastes have changed (I'm neurotic but not wasteful). So I really wanted to work in some color and cheap finds to go with what I already gots. That's when I stumbled across this little genius:
http://vintagerevivals.blogspot.com/2012/01/master-bedroom-before-and-after.html
This gal, Mandi, has the most incredible blog. She has fantastic taste and design skills and she's pretty damn handy. Love her. I hate to even share her with you because she is WAY cooler than me, but I figure it's good karma :)
So yup, that's where I stole/borrowed these ideas. Even bought the same headboard (I think) as her :-) So here is my before pics and after.


Basically it's a process called board and batten and Mandi has a WHOLE tutorial on her blog if you are interested in doing this. Her tips and techniques really did work. Took us about 2 whole days with 2 kids slowing us down a bit. The hardest part is getting the math right for hanging the boards. Once you get that figured, it's all down hill. I ordered this metal headboard from overstock.com and I couldn't be happier with it. It came in black so I took it outside and assembled it with Ryan. Then used a primer and can of spray paint (matte nickel) to get this effect. It goes with the hardware on my furniture.
I'm planning to sell my two nightstands and pop in the ones I bought at my Round Top trip. I'm thinking of painting those a turquoise or teal or kelly green. Would love your thoughts people!!!
I still have several smaller projects that I'm working on and will share over the coming weeks.
* curtains
* refinish my nightstands from Round Top
* new lamps
* craft table make over
* grandpa's lamp
Saturday, April 14, 2012
Project 52: FIFTEEN
Better late than never, right? We've been in San Diego this last week and are finally just getting back to normal. It was a FANTASTIC trip. I love everything about that place (expect the cost of living). It's a place that I hold very near and dear to my heart. Ryan and I lived here for a year during our second year of marriage. Besides all things wonderful that California has to offer, it's where we really became our own little family. Really learned to be married and rely on each other. Taking our children there was nothing short of joyful. It was odd to see our littles playing on the beaches where we used to dream them up. San Diego is truly my happy place. You know when you are in pain (i.e. labor) and they tell you to visualize THAT place. Well that warm beach air with the crisp bite that smells of sea salt and sweaty sunscreen is right where my mind goes. I almost hate to blog on it because it's a little piece of my soul that is hard to share with others. Regardless, here's a little glimpse of a place I couldn't be more grateful for.

Monday, April 9, 2012
My Happy Place- Round Top, TX
Twice a year this little bitty town, 2 hours east of San Antonio, holds an antique fair that will drop your socks. There is no explaining the madness that takes over this town. It's like your on this sweet country drive through wildflowers and cow pastures and then BAM, tent freakin city of awesomeness. More shit than you could ever dream of. You need it, they got it. You want it, they'll find it. You weren't looking for it, it'll bite ya in the ass. Hence my purchase of a vintage baby scale. Yup, I had to have to it.

The Low Down. What do all these vendors sell? Let me put it to you this way- I've bought drinking straws made from glass (yup, just like Oprah's) and a 6 foot spiderweb candelabra for Halloween. They have it all. New clothes and boots, old saddles and minks. Our family friends have a booth for pennants (it's a serious amount of pennants- every team, school, event you could think of and one kick ass gift for your spouse/ boyfriend or even college roommate). Bring cash, check (holy geez Carrie I really thought you knew that) and credit. Cash speaks loudest, but most vendors take additional forms of payment. You can expect a gentle negotiation (usually reduce the listed price by about 10%). The air conditioned buildings (Cole's is my favorite) are slightly higher priced with higher quality merchandise (these vendors usually really know their inventory). Outdoor tented areas and field vendors have a REALLY wide variety of stuff and it's more like a treasure hunt.
Wear comfy shoes and layered clothes. I like to pack a couple of those bags that roll up and stow in your purse for extra handling of my purchases. I usually bring a granola bar or two and some water since it may be a bit of a trek to get to a dining area (they have everything from girly sandwiches to bbq).
Round Top happens twice a year. The last weekend in March through the first weekend in April. Then again in the fall (last weekend in September and first weekend in October). The first weekend has a bit more selection before it's all picked over. The second weekend I see better deals because vendors don't want to pack it all up. You can't go wrong. If you plan to stay the night (and yes, there is plenty worth seeing over 2 days- think Disneyland), then plan ahead. B&Bs fill up fast.
Children? Well I wouldn't. I've brought an infant there before but I had help from my husband. You don't see many kids out there and there isn't a whole lot for them to do. Husbands? Well depends on your man. Mine likes to see our friends and family and enjoy a beer (yup, booze is allowed and encouraged) out there but the amount of shopping is pretty much his idea of hell. Our compromise? He gets to stay at home, but watches the kids and I get a day to myself.
Here's a few shots of my FAVORITE booths:
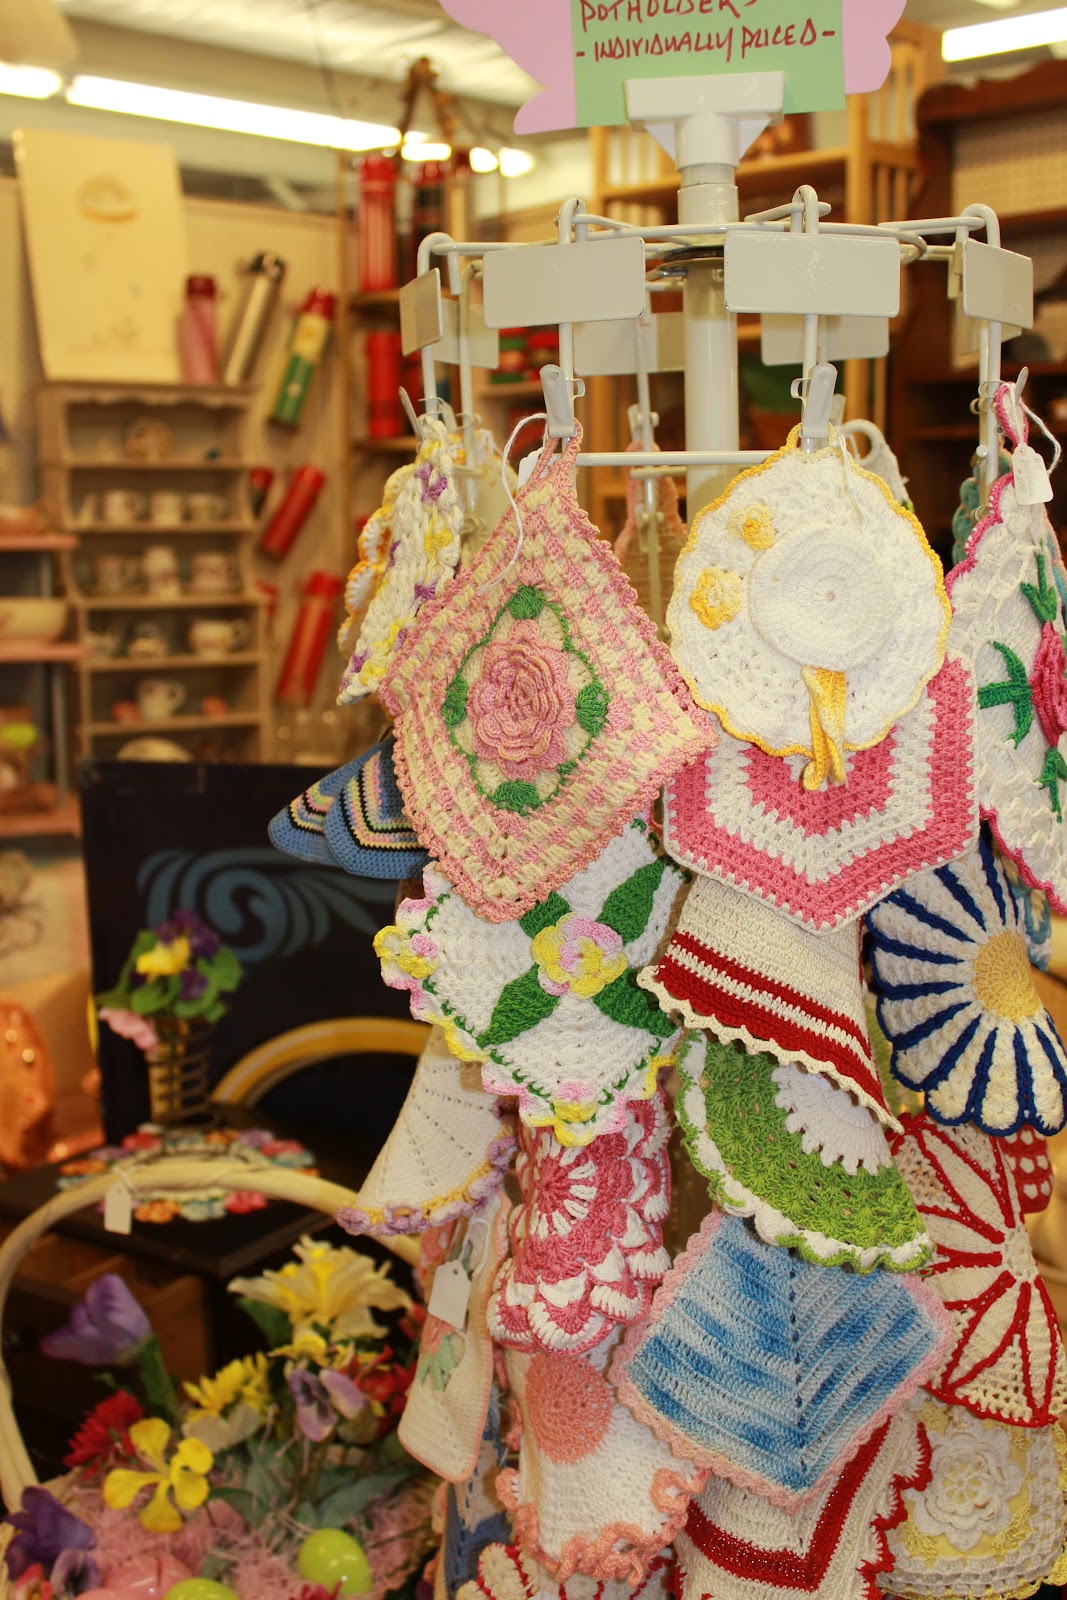
This is Traci's shop. She's like a mini Anthropology with authentic stuff. How cute are those coasters? And I LOVED her display of thermoses in the back.

My mom and I refer to this booth as The Kitchen Lady. She has EVERYTHING vintage for your kitchen. It's all in perfect condition and the cutest little color coordinated sets. I mean seriously, pedestal glass celery holder? Yes, please.

Ran across this darling booth just outside of Cole's called Flown the Coop. This place really had my brain going 90 miles an hour with creative flow. Love this desk in the center. See how they painted just one handle white? Clever.

Box of lace. Need I say more? You'll see a little Pinterest slip project I'm planning in the future with a little swatch I picked up here.
So here's what I actually I took home this trip:

Twin bed frame for Rhett's room. Two 1920's nightstands that need some love and COLOR. Drink carrier, two hand painted oils, 2 cake toppers (I collect these), hanging files for my master bedroom, wooden tray for God knows what?, and an & symbol for my bookshelves.

Best part is the little bits of history you find. Thanks Ms. Bess Booth McKay for my sweet little paintings!

Thought I would use this old card catalogue for organizing my photos. Opened it at home and found an old card from a church listing- rather amusing.
No trip to Round Trip is complete without a dinner at my FAVORITE restaurant ever. It's called Brazos Belle and it's primarily French cuisine featuring excellent beef and fish selections. Chef Andre always says hello to his guests and has an awesome selection of wines and dessert as well (must get the chocolate mousse).

Round Top resumes this fall September 27th- October 6th. Hope you check it out. I pretty much go rain or shine twice a year (only exceptions are like labor and it would have to be imminent labor at that).
Friday, April 6, 2012
Project 52: FOURTEEN
Sleep. All I want to do right now is sleep. Finally get baby number two down and number one wakes up. Ugh. Just a 30 minute nap. Shoot, 15 minutes would do me solid. It's been one of those go go go weeks. I find these weeks to blessings because it usually means the day flies by and we got to do lots of fun stuff. But today I am wiped and ready for a little mommy TLC. And tomorrow I get it... off to Round Top, TX (don't know what this is? no worries! I'm blogging on it this week). So here's a little self portrait of me at this very moment. Yikes! BUT here's to rest and refilling my tank tomorrow. So grateful for all the busyness that heeds an even better rest!


Wednesday, April 4, 2012
Mary Mary Quite Contrary
How does your garden grow? Well mine is easy (pea)sy! Word up I love a good garden pun. So here's the dill pickle. I have three gardens- veggie, herb and flower. What? Gardens in this heat? Why yes! There are lots of great spring veggies to plant that don't take a lot of attention. Here's how to get crackalackin. (I'll post on my herb and flower garden later)
Veggie Garden:
1. A few years ago, my neighbor (who I liken to Mary Poppins) decided to plant a "shared" garden. We removed one panel of fence and put in a raised bed. Let me break this down for you. Get some 2x10's and create a rectangle (whatever size you desire). Anchor the boards to some square posts in the corners. Place in desired location (somewhere where you get a lot of sun and can reach with a water hose). Now put down about 2-4 inches of sand (prevents grass and weeds from growing up from the bottom). Now fill with good soil (you will probably need to have this delivered since it's a large amount). Since we have the garden on both sides of the fence we decided to add some chicken wire so that veggies that vine could travel upwards and save some garden space (i.e. cucumbers, green beans etc).

2. Now you need to choose what to plant. Since I live in central Texas, this is all I know.
* You definitely need to plant some tomatoes. You pick your variety (that's the fun part). I love heritage and celebrity varieties but really you can't go wrong. These get pretty big and create shade so put these towards the back of your garden. I love planting tomatoes because you can pick when they are large enough and allow them to ripen indoors before birds and bugs eat them and need I say it, fried green tomatoes... delicious! (tip- you do need to buy those tomato cages because as your plant begins to produce the limbs get heavy and break)
* Cucumbers did great for me my first year and not so great my second (big draught didn't help!). Plant these where you have room for them to trellis or lots of square footage because they GROW.
* Green beans- either a bush or vining variety work. These are awesome because you can pick a handful and cook them up for dinner or collect them as they mature and store in your freezer till you are ready to cook all at once.
* Peppers- particularly jalapeños and banana peppers do REALLY well. I've had success with bell peppers as well but they tend to be quite a bit smaller than store bought ones. Since these are easy to maintain and not too big I put these towards the front of my bed. (If you don't have a large space for a garden consider a "salsa" garden with just tomatoes and pepper varieties!)
* Onion- These are delicious but a bit delicate in their early stages. They also take a while and you only get as many as you plant. These need a little space and some sun so plant toward the front where you can monitor.
* Carrots- Since these are a root plant they only grow as deep as your soil and for me this wasn't too big. They are really fun for kids to pick though. Same rules as the onion- plant near the front where you can assure they have sun and water.
* Squash/ zucchini- Did great one year and awful the next. You have to really watch for a certain insect with these bad boys. Mine got killed pretty early last year but I had a wonderful crop in years prior. I plant my squash in the corner of my backyard and not in the garden because these get enormous.
* Okra- this will be my first year with this plant but I've been assured these are big producers in this heat.
* This is by no means an all inclusive list. I just happen to really love these veggies. Other fun ones to try might be radish, pumpkins and perhaps some melons.

3. In terms of choosing your specimens for planting head to your local nursery. I love Milbergers and Rainbow Gardens here in San Antonio but honestly Home Depot has quite a bit in the spring. Many of these veggies grow really well from seed. I usually will buy a starter plant of tomato, peppers and okra. They are a bit heartier this way. For seeds you just have to follow the package directions- super simple. For choosing a starter plant I try to pick one with a heartier stem that is growing as straight up as possible with lots of low leaves (generally choose one that looks "healthy" to you and you can't go wrong).
4. Don't get frustrated.
*Some years are better than others.
* You get better as you go.
* Nothing is as good for a garden as rain and good soil.
* Once you get an insect infestation it's best to pluck the plant in my experience and let it go. Yes there are some solutions but I haven't been successful yet.
* Lots of blooms but no veggies? Could be several things. You may just need rain. You may need to mate the male and female sex organs... yup, they have those "parts". Also try adding some healthy soil from a nursery (or from your compost :)
* Gardening can be year round. There are lots of great fall/winter veggies. (I'll post on these later).
* Adding some bright flowers attracts butterflies and bees which help pollinate your plants.
* Nope, it's not cost effective but it's damn good for the soul. I love to see what I can sow. And nothing tastes better than fresh from the garden.
* You need a good reference book. I love my Neil Sperry's Complete Guide to Texas Gardening. Easy to find a great used version on Amazon.

I used to visit and revisit it a dozen times a day, and stand in deep contemplation over my vegetable progeny with a love that nobody could share or conceive of who had never taken part in the process of creation. It was one of the most bewitching sights in the world to observe a hill of beans thrusting aside the soil, or a rose of early peas just peeping forth sufficiently to trace a line of delicate green. ~Nathaniel Hawthorne, Mosses from and Old Manse
Subscribe to:
Posts (Atom)